

A functional kitchen faucet plays a crucial role in daily household activities, facilitating tasks such as dishwashing, food preparation, and general cleaning. Its significance extends beyond mere functionality, impacting the overall efficiency and convenience of the kitchen. A smoothly operating faucet contributes to a seamless workflow, making routine chores more manageable. However, there are instances when replace a kitchen faucet becomes necessary.
Common reasons include wear and tear over time, persistent leaks, outdated design, or the desire to upgrade to a more modern and efficient model. Recognizing the importance of a fully operational kitchen faucet and understanding the motivations for replacement sets the stage for a successful and satisfying home improvement project.
Preparation

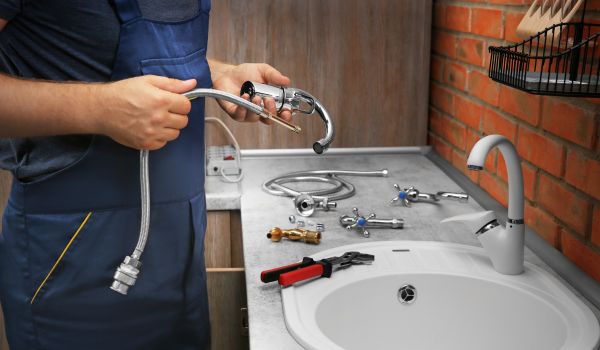
Gather the necessary tools and materials
Before initiating the replacement process, it’s essential to assemble all the tools and materials required for a smooth transition. Common tools include an adjustable wrench, pliers, plumber’s tape, and a bucket. Additionally, ensure you have the new one along with any components it comes with, such as nuts, bolts, and a user manual.
Turn off the water supply
To avoid any potential damage or accidents during the replacement, locate and turn off the supply valves beneath the sink. These valves are typically located on the lines leading to the. Turn both the hot and cold valves clockwise until they are fully closed.
Clear workspace under the sink
Create a clean and accessible workspace by removing any stored items or clutter under the sink. This provides ample room to maneuver during the removal and installation processes and minimizes the risk of damage to the new or any existing plumbing components.
Removal of Old Faucet

Disconnect water supply lines
Shut off water valves
Before proceeding with the removal, ensure that the supply valves are completely closed to prevent leakage. Turning these valves clockwise will cut off the flow.
Use an adjustable wrench to disconnect lines
With the supply turned off, use an adjustable wrench to disconnect the supply lines connected to the faucet. Place a bucket beneath the connections to catch any residual water.
Remove the old faucet
Loosen and remove mounting nuts
Locate the mounting nuts securing them to the sink or countertop. Using an appropriate tool, typically an adjustable wrench, loosen and remove these nuts.
Detach the faucet from the sink or countertop
Once the mounting nuts are removed, carefully detach the old from the sink or countertop. Check for any additional securing mechanisms and disconnect them to completely remove the old faucet.
Installation of New Faucet
Prepare new faucet for installation
Before beginning the installation of the new, carefully review the manufacturer’s instructions provided with the product. Familiarize yourself with the components and steps involved in the assembly process.
Assemble any required components
If the new comes with various components or requires some assembly, gather all the necessary parts. Follow the manufacturer’s instructions to correctly assemble the components. This may involve attaching handles, connecting spouts, or securing additional features such as a sprayer or soap dispenser.
Follow the manufacturer’s instructions
Manufacturers provide specific guidelines for installing their products, and it’s crucial to follow these instructions to ensure a proper and secure installation. Pay attention to any special requirements or recommendations regarding tools, techniques, or potential adjustments needed for your specific model.
Position the new faucet
Align faucet with mounting holes
Carefully position the new over the mounting holes on the sink or countertop. Ensure that the aligns correctly with the designated holes and that any additional features, such as a side sprayer or soap dispenser, are positioned according to the layout specified in the manufacturer’s instructions.
Secure faucet in place
Once the is correctly aligned, secure it in place by tightening the mounting nuts or bolts provided. Use the appropriate tools, such as an adjustable wrench, to ensure a snug fit. Be cautious not to overtighten, as this could damage the or the sink.
Connect water supply lines
Use Teflon tape on threads
Before connecting the supply lines, wrap the threads of the connections with the plumber’s tape (Teflon tape). This helps create a watertight seal and prevents leaks. Apply the tape in a clockwise direction, ensuring it does not interfere with the threading.
Tighten connections with an adjustable wrench
Connect the supply lines to the corresponding hot and cold inlets on the. Use an adjustable wrench to tighten the connections securely, but avoid excessive force that could damage the threads. Double-check that all connections are snug and properly aligned.
Testing
Turn on the water supply
Once the new is securely installed, turn the supply valves beneath the sink counterclockwise to restore flow. Gradually open the valves to avoid sudden pressure surges.
Check for leaks
Inspect all connections, including those between the and the supply lines, for any signs of leaks. Address any leaks promptly by tightening connections or applying additional Teflon tape if necessary.
Test hot and cold water functionality
Test the functionality of both hot and cold by turning the respective handles on the. Ensure smooth and consistent flow from each side.
Ensure proper water flow
Verify that the flow is adequate and matches your expectations. Check for any unusual sounds or disruptions in the flow that may indicate an issue with the installation.
By following these installation steps and conducting thorough testing, you can ensure a successful replacement of your kitchen, providing you with a reliable and efficient fixture for your daily needs.
Finishing Touches

Clean up any excess sealant or debris
After the successful installation of the new kitchen, it’s essential to clean up any excess sealant or debris that may have accumulated during the process. Use a damp cloth to wipe away any stray caulk or plumber’s tape, ensuring a neat appearance. Pay attention to the areas around the base and the mounting holes, as well as any other surfaces that may have come into contact with installation materials.
Reconnect any additional components
If your new includes additional components such as a side sprayer or soap dispenser, now is the time to reconnect them. Follow the manufacturer’s instructions for attaching these accessories securely to the faucet. Ensure that all connections are tight and properly sealed to prevent leaks. Test the functionality of these components to confirm that they are working as intended.
Polish the faucet and surrounding area
To enhance the aesthetic appeal of your newly installed, take a moment to polish the entire fixture and its surroundings. Use a gentle cleaning solution appropriate for the material and a soft cloth to remove any fingerprints, spots, or smudges. This final touch not only ensures a visually pleasing outcome but also helps maintain the longevity of the by preventing the buildup of grime and mineral deposits.
Troubleshooting
Addressing leaks
If, after the installation and testing, you encounter any leaks, it’s crucial to address them promptly. Begin by identifying the source of the leak – check the connections between the water supply lines and the faucet, as well as any other potential points of leakage. Tighten any loose connections and, if needed, apply additional plumber’s tape to create a secure seal. If the issue persists, consult the manufacturer’s troubleshooting guide or seek professional assistance.
Ensuring proper alignment
Proper alignment is essential for both functionality and aesthetics. If you notice that the is not aligned with the sink or countertop, reevaluate the installation. Loosen the mounting nuts or bolts slightly, adjust the position of the, and then secure it again. Take care not to overtighten, as this could lead to misalignment or damage. Double-check that the facet is level and centered for an aesthetically pleasing result.
Checking for any issues with the water flow
If you experience issues with water flow, such as reduced pressure or irregular flow patterns, investigate the potential causes. Ensure that the water supply valves are fully open and that there are no obstructions in the supply lines. Check the aerator for any debris or mineral buildup, as this can affect water flow. Cleaning or replacing the aerator may resolve the issue. If problems persist, consult the manufacturer’s troubleshooting guide or seek professional advice.
Conclusion
Replacing a kitchen is a manageable and rewarding home improvement project that enhances both the functionality and aesthetics of your kitchen. Understanding the importance of a functional and recognizing the signs that necessitate replacement sets the foundation for a successful upgrade. Thorough preparation, including gathering the necessary tools and materials, and turning off the water supply, is crucial for a smooth installation process. Removing the old requires a systematic approach, including disconnecting water supply lines and carefully detaching the old fixture. By following these steps and paying attention to details, you can successfully replace your kitchen, contributing to a more efficient and visually appealing kitchen space.


