
A functional kitchen faucet is a crucial element in any household, serving as a primary tool for cooking, cleaning, and maintaining a hygienic kitchen environment. From washing dishes to filling pots and providing a convenient water source, the kitchen faucet plays a pivotal role in daily activities. Over time, wear and tear, mineral deposits, and changing design preferences may necessitate the replacement of the existing faucet. Additionally, upgrading to a more modern and efficient model can enhance the overall functionality and aesthetic appeal of the kitchen, making the decision to change a kitchen faucet a practical and often transformative choice for homeowners.
Preparing for the Replacement

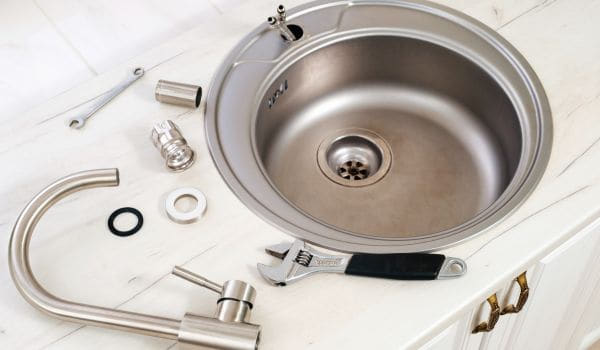
Gather the Necessary Tools and Materials
Before initiating the kitchen faucet replacement, assemble the essential tools and materials required for the task. This includes items such as an adjustable wrench, a plumber’s tape, a basin wrench, and a screwdriver. Verify the completeness of the new faucet package, ensuring all components and installation instructions are present.
Turn Off Water Supply
Prior to any disassembly, locate the shut-off valves beneath the sink. Turn the valves clockwise to fully close them, effectively shutting off the water supply. This precautionary step prevents water flow during the replacement process, minimizing potential mess and the risk of water damage.
Empty the Sink and Clear the Workspace
Create a conducive work environment by clearing the sink and its surroundings. Remove dishes, utensils, and any other items from the sink basin and adjacent areas. This not only provides unobstructed access to the faucet but also reduces the likelihood of accidental damage to items during the replacement. A clean and organized workspace contributes to a smoother and more efficient faucet replacement experience.
Removing the Old Faucet

Disconnecting Water Supply Lines
Shutting off Hot and Cold Water Valves
Begin the process of replacing your kitchen faucet by ensuring a safe working environment. Locate the hot and cold water shut-off valves beneath the sink. Turn each valve clockwise to shut off the water supply. This precautionary step prevents water leakage and allows for a controlled disconnection.
Disconnecting Flexible Supply Lines
With the water supply turned off, use an adjustable wrench to disconnect the flexible supply lines attached to the hot and cold water valves. Place a container beneath the connections to catch any residual water, minimizing potential mess and facilitating a cleaner workspace.
Removing the Mounting Nuts
Utilize a basin wrench or an appropriate tool to loosen and remove the mounting nuts securing the old to the sink. These nuts are typically located beneath the sink and may require some effort to loosen. Once removed, carefully detach any additional hardware holding the old in place.
Detaching the Old Faucet from the Sink
With the mounting nuts removed, gently lift and detach the old from the sink. Exercise caution to avoid damaging the surrounding fixtures or the sink itself. After removing the old faucet, take a moment to clean the sink surface thoroughly, preparing it for the installation of the new faucet.
Installing the New Faucet
Positioning the New Faucet on the Sink
Carefully position the new into the pre-existing mounting holes on the sink. Ensure that the is aligned correctly to guarantee a secure fit and an aesthetically pleasing appearance. Take note of any additional components or features of the new that may differ from the old one.
Securing the Faucet with Mounting Nuts
Secure the new in place by tightening the provided mounting nuts. Use a basin wrench or an appropriate tool for this task, ensuring that the nuts are tightened adequately to prevent any wobbling or instability. Verify that the is firmly secured to the sink.
Connecting Water Supply Lines
Attaching Flexible Supply Lines
Connect the new flexible supply lines to the corresponding hot and cold water valves. Use an adjustable wrench to tighten the connections, ensuring a snug fit without over-tightening.
Turning On Hot and Cold Water Valves
Gradually turn the hot and cold water shut-off valves counterclockwise to restore water flow. Monitor the connections for any potential leaks. If leaks are detected, carefully tighten the connections with the adjustable wrench until they are secure.
By following these steps meticulously, you can successfully remove the old kitchen and install a new one, ensuring functionality and preventing potential issues such as leaks. Always refer to the manufacturer’s instructions for specific guidance related to your model.
Checking for Leaks
Observing for Visible Leaks
After installing the new kitchen, conduct a visual inspection of all connection points, including those at the hot and cold water valves and the base of the. Look for any visible leaks or drips. If you notice water pooling or dampness, address the issue promptly by tightening connections or making necessary adjustments.
Running Water and Checking for Hidden Leaks
Turn on the hot and cold water gradually and observe for any hidden leaks. Check beneath the sink and around the for signs of water seepage. Allow the water to run for a few minutes to thoroughly assess the system. If hidden leaks are detected, pinpoint their source and take corrective action.
Tightening Connections if Necessary
If any leaks are observed during the inspection, use an adjustable wrench to carefully tighten the corresponding connections. Ensure that all nuts and fittings are securely fastened without over-tightening, as this can lead to damage. Periodically recheck for leaks, tightening connections further if needed until the system is leak-free.
Additional Considerations

Installing a New Aerator (If Applicable)
If your new faucet comes with a removable aerator, consider installing it to regulate water flow and minimize splashing. Screw the aerator onto the spout clockwise, ensuring a snug fit. This small addition can enhance water efficiency and improve the overall performance of your kitchen faucet.
Testing the Faucet’s Functionality
Before declaring the installation complete, test the functionality of the new faucet. Turn the handle or handles to ensure smooth operation and check for any unusual noises. Verify that the hot and cold water controls work correctly, and assess the water pressure to ensure it meets your expectations.
Cleaning Up the Workspace
Conclude the replacement process by cleaning up the workspace. Dispose of any packaging materials, old components, or debris properly. Wipe down the sink and surrounding areas to remove any fingerprints, water spots, or residue. A clean and organized workspace not only enhances the aesthetic appeal but also provides a sense of accomplishment after successfully replacing the kitchen faucet.
By following these final steps, you can ensure the proper functioning of your new kitchen and maintain a tidy and efficient kitchen environment. Regularly check for leaks in the days following installation to catch any potential issues early and address them promptly.
Troubleshooting
Addressing Common Installation Issues
Leaks
If you encounter leaks despite careful installation, double-check connections for tightness. Reapply plumber’s tape if necessary. If leaks persist, consider replacing faulty components or contacting the manufacturer for guidance.
Uneven Water Flow
Check for debris or sediment in the aerator. Clean or replace the aerator to restore proper water flow. Verify that the water supply valves are fully open.
Handle Issues
If the faucet handle is loose or difficult to turn, inspect the handle set screw. Tighten it as needed. For single-handle, ensure the cartridge is properly aligned.
Persistent Dripping
A persistent drip may indicate a faulty cartridge or valve. Assess the internal components and replace any damaged parts.
Seeking Professional Help if Needed
If troubleshooting does not resolve issues or if you are uncomfortable with any aspect of the installation, consider seeking professional assistance. Professional plumbers possess the expertise to diagnose and address complex problems, ensuring a reliable and efficient kitchen system. This is especially crucial if there are concerns about water pressure, complex plumbing systems, or if the is part of a larger renovation project.
Conclusion
Changing a kitchen is a manageable DIY task that can significantly enhance the functionality and aesthetics of your kitchen. By following a systematic approach, from preparation to troubleshooting, you can successfully replace your old with a new one. The importance of a functional kitchen cannot be overstated, as it plays a vital role in daily tasks.
Carefully remove the old faucet, install the new one, and check for leaks. Additionally, consider installing a new aerator for improved efficiency and test the faucet’s overall functionality. Troubleshooting is a crucial step to address common issues that may arise during or after installation. If challenges persist, do not hesitate to seek professional help to ensure a safe and effective solution.


