

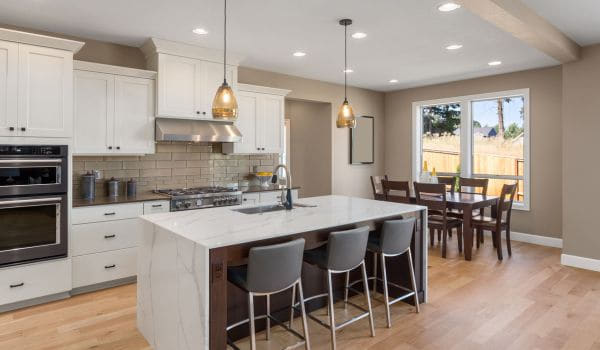
Constructing a kitchen island is more than just an upgrade; it’s a transformative journey that infuses style and function into the epicenter of your home. Whether your aim is to expand your culinary workspace, create a cozy nook for social gatherings, or amplify your storage solutions, the endeavor to build a kitchen island promises a significant enhancement to your living space.
This guide is your compass, directing you through the exciting phases of design conceptualization, ensuring that your island not only complements the aesthetic of your kitchen but also embodies durability and sophistication. Embrace the fusion of practicality and design elegance, and watch as your kitchen island becomes not just a mere addition, but a vibrant testament to your lifestyle.
Planning and Design

In this crucial phase, meticulous planning and thoughtful design lay the foundation for a successful kitchen island project. Determining the island’s size and layout is paramount, involving a careful assessment of available kitchen space and consideration of the island’s intended functions, such as providing additional counter space, storage, or seating. Striking a harmonious balance ensures the island seamlessly integrates into the existing kitchen layout.
Equally important is the selection of materials. Choices for the countertop, such as butcher block, granite, or quartz, require evaluation based on durability, maintenance, and aesthetic considerations. The cabinet and base materials should not only contribute to the island’s structural integrity but also align with the overall design scheme. The finer details, such as hardware and fixtures—handles, knobs, and faucets—add a finishing touch, balancing both style and functionality.
This meticulous planning ensures a well-defined vision for the construction phase, allowing the kitchen island to become a cohesive and purposeful addition to the space. With attention to size, layout, and material selection, the island transforms into a functional centerpiece, enhancing both the practicality and aesthetic appeal of the kitchen.
Tools and Materials
Comprehensive List of Tools
Power Tools
Saw
For precision cutting of lumber and countertop materials.
Drill
Essential for creating holes and fastening components securely.
Jigsaw
Ideal for intricate cuts to achieve a tailored design.
Hand Tools
Hammer
For driving in nails and ensuring a solid connection.
Screwdriver
Necessary for securing screws and assembling various components.
Measuring Tape
Ensures accurate dimensions for precise construction.
Safety Equipment:
Safety Glasses
Protects eyes from debris during cutting and assembly.
Ear Protection
Minimizes noise impact during power tool operation.
Dust Mask
Safeguards against respiratory irritants generated during construction.
List of Construction Materials
Lumber for Frame and Base
Choose sturdy lumber for the frame, ensuring stability and structural support.
Plywood or Cabinet Materials
Select plywood or other durable materials for crafting cabinet sides and back.
Countertop Material
Decide on the countertop material based on aesthetics and functionality (e.g., butcher block, granite, quartz).
Fasteners
Screws, Nails, and Fasteners: Select appropriate types and sizes for secure and stable assembly.
Paint or Finish
Choose a suitable paint or finish to enhance aesthetics and provide protective layers. The judicious use of these tools and materials forms the backbone of the kitchen island construction project. Each component, from power tools to safety equipment and construction materials, contributes to the overall success of the endeavor, ensuring a well-crafted, functional, and visually appealing kitchen island.
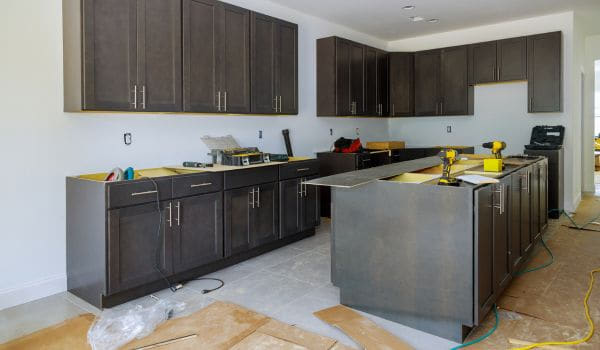
Construction Process
Embarking on the construction process of a kitchen island involves a systematic approach, ensuring precision and attention to detail at every step. This phase transforms the planned design into a tangible and functional centerpiece for the kitchen.
Build the Frame and Base
Cut and Assemble the Frame Using Lumber
The foundation of the kitchen island is laid by cutting and assembling the frame with carefully chosen lumber. This step involves meticulous measurements and precise cuts to create a sturdy and well-proportioned base.
Add Support Beams for Stability
To enhance the structural integrity of the island, support beams are strategically added. These beams contribute to the stability of the frame, ensuring it can withstand the demands of everyday use.
Attach the Base Using Appropriate Fasteners
The frame is securely attached to the support beams using appropriate fasteners. This step is critical for the overall stability of the, requiring a judicious selection of screws or nails to create a robust connection.
Build and Install the Cabinets
Cut and Assemble Cabinet Components
The construction of cabinets begins with the precise cutting and assembly of components. Each piece is crafted to fit seamlessly into the design, with attention to detail to ensure a cohesive and visually pleasing appearance.
Install Cabinet Sides and Back:=
The assembled cabinet components are then installed, forming the structural core of the kitchen. The cabinet sides and back are securely attached to the frame, creating a functional and aesthetically pleasing storage space.
Add Shelves or Drawers as Needed
Customization is key to meeting specific needs. Shelves or drawers are added based on the intended functions of the, providing convenient storage solutions tailored to the user’s requirements.
Install the Countertop

Cut and Shape the Countertop Material to Fit
The selection of countertop material, whether it be butcher block, granite, or quartz, is carefully cut and shaped to fit the dimensions of the. Precision is crucial to achieve a seamless and polished appearance.
Secure the Countertop to the Base
The countertop is securely attached to the base, ensuring stability and durability. This step involves using appropriate fasteners to create a strong and lasting connection between the countertop and the underlying structure.
Finish the Kitchen Island
Sand the Surfaces to Ensure a Smooth Finish
Before applying the final finish, all surfaces are meticulously sanded. This step not only ensures a smooth and even texture but also prepares the surfaces for the finishing touches.
Apply Paint or Finish According to Preferences
The choice of paint or finish is applied to achieve the desired aesthetic. This step not only enhances the appearance but also provides protection against wear and tear.
Install Hardware and Fixtures
The final touches involve installing hardware and fixtures. Handles, knobs, and faucets are added to complement the design, adding both functional and decorative elements to the kitchen island.
Installation in the Kitchen
Ensure the Kitchen Island Fits Seamlessly into the Available Space
Before finalizing the installation, it is crucial to ensure that the kitchen harmoniously integrates into the available space. Confirming proper alignment with the kitchen layout and leaving adequate clearance ensures a cohesive and functional arrangement.
Connect Plumbing if the Island Includes a Sink
For with integrated sinks, connecting plumbing is a critical step. This involves coordinating water supply and drainage, ensuring a seamless flow of water to and from the sink. Attention to plumbing details guarantees the functionality as a complete and operational workspace.
Test and Verify the Stability and Functionality
Thorough testing is essential to validate the stability and functionality of the completed kitchen. This includes assessing the sturdiness of the structure, the functionality of drawers and shelves, and any integrated features. Rigorous testing ensures that the meets both safety and practicality standards.
Conclusion
In the culmination of the kitchen construction project, a well-executed installation phase is vital to realizing the envisioned benefits. By ensuring a seamless fit into the available space, connecting plumbing with precision, and rigorously testing stability and functionality, the kitchen transforms from a conceptual design into a practical and aesthetically pleasing addition to the home. The installation process represents the final steps in bringing the project to fruition, and attention to detail during this phase is paramount. Confirming proper alignment not only enhances the visual appeal of the kitchen but also contributes to an efficient and ergonomic workspace. Connecting plumbing, when applicable, adds a layer of functionality, transforming the into a versatile area for meal preparation and cleanup.


