Understanding how to remove a kitchen faucet is essential for both routine maintenance and addressing issues that may arise over time, such as leaks or worn-out components. Additionally, this knowledge becomes crucial when considering upgrades or replacements. Being able to execute the removal process independently can lead to cost savings by eliminating the need for professional plumbing services.
The overall process involves several key steps, including identifying the type, disconnecting water supply lines, removing the handle(s) and body, and potentially uninstalling additional components. This overview aims to provide a systematic approach, ensuring a safe and efficient removal while minimizing the risk of damage to the sink or plumbing fixtures.
Tools and Materials

List of Required Tools
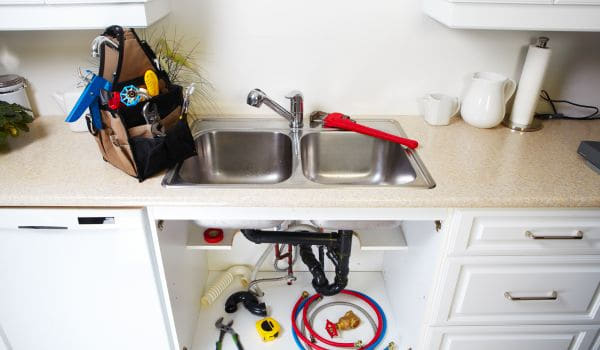
To successfully remove a kitchen faucet, gather the following essential tools
Adjustable wrench or pliers
For loosening and tightening nuts and bolts.
Plumber’s tape
To create a secure seal when reassembling.
Bucket or towels
To catch water and prevent any mess.
Screwdrivers
Flathead and Phillips, for removing screws and securing components.
Basin wrench
Specifically designed for hard-to-reach nuts under the sink.
Plumber’s putty or silicone caulk
For sealing gaps during reinstallation.
Optional Materials for Specific Faucet Types
Allen wrench
For faucets with set screws, commonly found in single-handle faucets.
Teflon tape
Used for creating a watertight seal on threaded connections.
Bucket or basin
If the sink lacks a built-in basin, an additional container is useful for catching water.
Preparation

Turn Off the Water Supply
Begin by turning off the water supply to the kitchen. Locate the shut-off valves beneath the sink and turn them clockwise until fully closed. This crucial step prevents water leakage during the removal process.
Clear the Sink Area
Remove any items from the sink and surrounding area to provide ample workspace. Clearing the space ensures easy access to the and prevents tools or debris from falling into the sink.
Prepare a Bucket or Towels to Catch Water
Place a bucket beneath the sink to catch any residual water that may escape during the removal process. Alternatively, lay towels on the cabinet floor to absorb water and keep the work area dry.
Identify Faucet Type

Single-Handle Faucet
For single-handle faucets, locate the set screw, typically concealed beneath a decorative cap or directly visible on the handle. Use an Allen wrench to loosen the set screw before proceeding with handle removal.
Double-Handle Faucet
Double-handle faucets often have caps covering the screws securing the handles. Remove these caps and use a screwdriver to loosen and remove the screws, allowing the handles to come off.
Pull-Out or Pull-Down Faucet
In the case of pull-out or pull-down, focus on detaching the handle or cover. Look for a set screw or other fasteners that secure the handle, and use the appropriate tool to remove them.
Understanding the tools needed and the preparatory steps sets the foundation for a smooth faucet removal process, ensuring that you have everything in place before delving into the specific tasks associated with each type.
Disconnect Water Supply Lines

Shut Off Valves
Before proceeding with the removal, ensure the water supply is completely shut off. Locate the shut-off valves under the sink and turn them clockwise until they are fully closed. This precaution prevents water from flowing during the removal process.
Use Adjustable Wrench or Pliers
Once the water supply is off, use an adjustable wrench or pliers to disconnect the water supply lines from the. Place the wrench or pliers on the nuts securing the water supply lines and turn them counterclockwise to loosen. Be prepared for some residual water to drain, which can be caught using the previously placed bucket or towels.
Remove Faucet Handle
Single-Handle: Set Screw or Decorative Cap Removal
For single-handle, identify the set screw securing the handle. This screw is often concealed beneath a decorative cap. Use an appropriate tool, such as an Allen wrench, to loosen and remove the set screw. Once the set screw is removed, the handle can be lifted or pulled off.
Double-Handle: Cap or Decorative Cover Removal
In the case of a double-handle, look for caps or decorative covers on each handle. Remove these covers to reveal the screws securing the handles. Use a screwdriver to loosen and remove the screws, allowing you to lift off the handles.
Pull-Out or Pull-Down: Detach Handle or Cover
For pull-out or pull-down, focus on detaching the handle or cover. Locate any set screws or fasteners securing the handle and use the appropriate tool to remove them. Once detached, the handle or cover can be lifted away.
Remove Faucet Body
Unscrew Mounting Nuts or Bolts
To remove the body, locate the mounting nuts or bolts securing it to the sink. Use an adjustable wrench or pliers to turn these nuts or bolts counterclockwise, loosening their grip.
Lift the Faucet Body from the Sink
With the mounting nuts or bolts loosened, carefully lift the body from the sink. Ensure that any additional components, such as the sprayer hose or soap dispenser, are also disconnected before completely removing the faucet.
By following these steps, you can efficiently disconnect the water supply lines, remove the faucet handles, and extract the body, preparing the sink for any necessary repairs or the installation of a new one.
Disconnect Additional Components
Sprayer Hose
If your kitchen is equipped with a pull-out or pull-down feature, you’ll need to disconnect the sprayer hose. Locate the connection point, often found under the sink. Use an adjustable wrench to loosen the nut securing the hose, and then gently pull the sprayer hose away from the.
Soap Dispenser or Side Sprayer
For faucets with additional components such as a soap dispenser or side sprayer, disconnect these items as well. Depending on the design, you may need to turn a nut counterclockwise or release a quick-connect mechanism. Follow the manufacturer’s instructions for the specific model.
Clean the Area
Remove Any Remaining Debris or Sealant
Once all components are disconnected, inspect the area for any remaining debris or sealant. Remove old plumber’s putty or silicone caulk from the sink surface and surrounding areas. A putty knife or scraper can be useful for this task. Cleaning the area ensures a smooth and clean surface for the new installation.
Clean the Sink Surface
Take the opportunity to clean the sink surface thoroughly. Wipe away any accumulated grime, residue, or mineral deposits. This step not only enhances the aesthetics but also promotes a better seal when installing the new.
Installation of a New Faucet
Brief Overview of Installing a New Faucet
If you’re replacing the old faucet with a new one, here is a brief overview of the installation process:
Position the New Faucet
Place the new into the mounting holes on the sink, aligning it properly.
Secure Mounting Nuts or Bolts
From underneath the sink, secure the new in place by tightening the mounting nuts or bolts.
Connect Water Supply Lines
Reconnect the water supply lines to the corresponding hot and cold water inlets on the new faucet. Use the plumber’s tape to ensure a tight seal.
Attach Additional Components
If your new includes a sprayer hose, soap dispenser, or side sprayer, follow the manufacturer’s instructions to attach these components.
Turn On the Water Supply
Gradually turn on the shut-off valves to restore the water supply to the. Check for any leaks and make adjustments as needed.
Connection of Water Supply Lines
When connecting water supply lines, ensure a secure and watertight seal. Wrap the threaded ends of the supply lines with the plumber’s tape before attaching them to the corresponding inlets on the new. Use an adjustable wrench to tighten the connections, taking care not to overtighten.
Conclusion
Knowing how to remove a kitchen is a valuable skill for homeowners, enabling them to perform routine maintenance, address issues, and make upgrades independently. The process involves systematically disconnecting water supply lines, removing faucet handles and the body, and optionally, uninstalling additional components. Taking care to clean the area thoroughly prepares the sink for either repairs or the installation of a new faucet. Whether you are maintaining the existing or installing a new one, following these steps ensures a successful and hassle-free experience. Regular maintenance and proper installation contribute to the longevity and efficiency of the kitchen faucet, ultimately enhancing the functionality and appearance of the kitchen space.


