Fix a cabinet door that has been ripped off its hinges can be a daunting task, but with the right approach and tools, it’s a repair that you can accomplish with relative ease. To start, the first step is to assess the damage. Examine the extent of the damage and determine whether the door, hinges, or both are affected. Understanding the scope of the problem will help you plan the necessary repairs effectively. Once you’ve assessed the damage, you can proceed to gather the necessary tools and materials. You’ll need items such as a screwdriver, wood glue, clamps, screws, and a drill to successfully reattach the gate. It’s important to have everything ready before you begin the repair process, as this will streamline your work and make it more efficient.
Should I remove the cabinet door completely?
When faced with a cabinet door that has been ripped off its hinges, one of the common questions is whether to remove it completely. In most cases, it is recommended to detach the door from the cabinet to make the repair process easier. By removing the gate, you’ll have better access to the damaged areas and be able to work more effectively. However, if you’re dealing with a simple hinge issue or minor damage, you may not need to take off the entire gate. Assess the extent of the damage before making a decision.
What type of screws should I use?
Choosing the right screws is crucial when fixing a council door that has been ripped off its hinges. Opt for high-quality and sturdy screws that are specifically designed for cabinetry work. It’s important to use screws that are long enough to reach deep into solid wood and provide stability. If you’re unsure about which screws to use, consult with an expert at a hardware store or refer to your cabinet’s manufacturer guidelines for recommendations.
Is it possible to repair the ripped wood?
Repairing ripped wood on a cabinet gate can be challenging but not impossible. To fix this issue, start by removing any loose splinters or debris around the damaged area carefully. Next, using quality wood glue that is suitable for cabinetry repairs, apply a generous amount to both sides of the torn section. Press them firmly together and secure them in place using clamps until the glue dries completely.
Understanding the Types of Hinges
When it comes to Fix cabinet doors and hinges, there are several types to be aware of in order to make informed decisions during the repair process. The following are four common types of hinge used with cabinet doors:
1. Butt Hinges

Butt hinges are one of the most traditional and commonly used hinge types for cabinets. They consist of two plates, one attached to the door frame and the other to the gate itself. When the gate is closed, the plates interlock, providing support and stability.
2. Euro Hinges
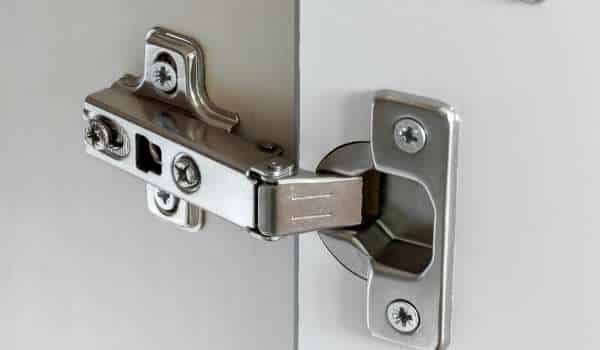
Euro hinges, also known as concealed or cup hinges, offer a sleek and modern look. These hinge are mostly invisible when the cabinet door is closed since they are installed inside a drilled cup hole on the backside of the gate. Euro hinge allow for easy adjustment in three directions: up and down, side to side, and in or out.
3. Pivot Hinges

Pivot hinges offer a unique functionality by allowing the gate to pivot on a single point at either the top or bottom of the cabinet. These joints are often used with hidden or glass doors where it is desirable for them to swing open smoothly.
4. Hidden Hinges

As their name suggests, hidden hinges remain concealed when installed on cabinet doors. They offer an aesthetic advantage by keeping hardware out of sight for a cleaner appearance.
Fix Torn Hinges
1. Assess the Damage

The first and most crucial step in addressing a cabinet door that has been ripped off its hinges is to assess the extent of the damage. Examine the gate, joints, and the cabinet frame to determine what parts need repair or replacement. Be thorough in your inspection to identify any other issues, such as chipped or splintered wood, that may require attention. This evaluation will help you formulate a plan for the necessary repairs and ensure a more effective outcome.
2. Gather Necessary Tools and Materials
With a clear understanding of the damage, the next step is to gather the essential tools and materials required for the repair. You’ll need items such as a screwdriver, wood glue, clamps, screws, and possibly a drill, depending on the specific repair needs. Having these tools and materials ready before you begin the repair process will streamline the work and reduce potential interruptions, making the repair process more efficient.
3. Remove the Door

Once you have the necessary tools and materials, it’s time to remove the cabinet gate from its hinges completely. Begin by locating any remaining screws or fasteners that secure the door to the cabinet frame. Carefully remove these fasteners to detach the gate. Take your time during this step to avoid causing any further damage to the gate or the cabinet itself. Removing the door will make it more accessible for the subsequent repair steps.
4. Repair or Replace Hinges

The hinges are a critical component of your cabinet door’s functionality. Depending on the extent of the damage, you may need to repair or replace the hinges. If the joints are still in good condition, you can repair them by tightening loose screws, applying lubrication, or making minor adjustments. However, if the joints are damaged beyond repair, it’s essential to replace them with new ones that match the size and style of the old hinges. This step is crucial for ensuring the door functions smoothly once reattached.
5. Reattach the Door

With the hinges repaired or replaced, it’s time to reattach the cabinet door to the council frame. Carefully position the gate in place, ensuring it aligns properly with the cabinet frame. Use your screwdriver and the appropriate screws to secure the hinges to both the gate and the cabinet. Make sure the gate opens and closes smoothly without any resistance or misalignment. Proper alignment and secure attachment of the hinges are essential for the door’s functionality and overall appearance.
6. Fill and Sand

The final step in fixing a cabinet gate that’s been ripped off hinges involves making any necessary cosmetic repairs. If there are noticeable gaps, holes, or cracks in the gate or the council frame, use wood filler to fill these imperfections. Once the filler is dry, sand the entire door and surrounding area to create a smooth and even surface. Sanding not only improves the appearance but also ensures that the gate fits seamlessly within the cabinet frame. After this step, you can finish the repair by painting or staining the door to match the rest of the cabinet, leaving it looking as good as new.
7. Realign and Adjust

Once you’ve repaired or replaced the hinges, reattached the cabinet gate, and filled and sanded any imperfections, the next crucial step is to realign and adjust the door. To ensure that the door opens smoothly and functions properly, check its alignment within the cabinet frame. If the gate doesn’t sit flush with the frame or closed improperly, you may need to make further adjustments to the joints. Use your screwdriver to fine-tune the hinge positions, ensuring that the gate fits perfectly and opens and closes without any resistance or misalignment. Proper alignment is essential for both functionality and the overall appearance of the cabinet.
8. Apply Finish

To complete the cabinet gate repair, applying a finish is often necessary. The type of finish you use will depend on the material and style of your council. If the council is made of wood, consider staining or painting it to match the rest of the cabinetry. A fresh coat of paint or a new stain will not only enhance the door’s appearance but also protect it from future damage, such as moisture or wear and tear. Applying a finish not only makes the repair visually seamless but also adds longevity to the council door.
How Do I Ensure the Door Opens Smoothly?
To ensure that the cabinet door opens smoothly, you should regularly maintain and lubricate the hinges. Apply a lubricant, such as oil or silicone-based spray, to the hinges to reduce friction and prevent squeaking. Regular maintenance is the key to keeping the gate in excellent working condition and extending its lifespan. Additionally, make sure that any adjustments to the joints are precise and that the gate is properly aligned within the council frame, as mentioned earlier. This will help maintain smooth and trouble-free operation.
Conclusion
Fixing a cabinet gate that has been ripped off its hinges may seem like a daunting task, but by following these steps, you can successfully complete the repair. Start by assessing the damage, gathering necessary tools, and removing the door. Then, repair or replace the hinges, reattach the gate, fill and sand any imperfections, and make any necessary adjustments. Applying a finish will not only enhance the appearance but also protect the door. Regular maintenance and precise alignment are essential for ensuring the door opens smoothly and functions properly. With patience and attention to detail, your cabinet gate will be as good as new, and your council will regain both its functionality and aesthetic appeal.